Hello world! Today I will teach you how to “Change the hair color in someone’s picture”. Our final result would be something like this:

I will be using a picture of an actress Debby Ryan. You can use any picture you want but I will advise that you should use some picture in which hair are prominent so that you can practice better.
Let’s get started with it. Open your software and in your software, open a picture in which someone’s hair is prominently seen. After you open your project picture, your screen would look like the following picture:

Now, Take the Brush Tool from Tools Tab or simply press B. After taking brush tool go to the bottom of Tools Tab and press Quick Masking button. This button is mentioned by the Step 2. After press quick masking button, go to the top of screen and set the rush Properties i.e. size, type, flow, radius and opacity etc. which are mentioned by the Step 3 in the picture below. After setting the brush, go to the picture and apply brush on hair. See following picture, follow the numbered step:

Change the size, opacity and flow of brush where needed. Remember, whatever color you choose for the brush, the hair will be painted red. Don’t worry; this is a part of tutorial.
See following picture:

After applying brush on desired part of picture, go to Tools Tab and select the tool which is mentioned in the following picture with number 1. Now go to the bottom of the Tools Tab and press the button that is mentioned with number 2. This will turn the red hair paint in to a selection on the picture. If you notice, the selection in the picture now includes the area except the hair. To select only hair, go to Menu Bar and click on Select Menu. In drop down menu, click Inverse button.
See following picture for more detail:

Now the hair area only is selected. Go to Layer Menu and in drop down menu click on New Fill Layer option and in next menu, click Solid Colour. See the following picture:

Now that the hair is selected, go to Menu Bar and click on Layer Menu. In drop down menu, click on New Layer option and in new small menu click on Solid Color. A small new window will open on your screen like picture:

Set the Mode to Soft Light, Opacity to 100% and click OK button. Now another small window will open on your screen asking you to set the color that you want the hair to be. Just like following picture:

Now set the color and click OK button. You will have your edit. My edit looks like following:

Now save it in .jpg format and also in .psd format so that you can reuse this project whatever you want.
That’s all for this tutorial. I hope it helped.
Like it, Rate it, Comment and Follow for more. Any question? Feel free to ask!
Hello world! Welcome to a new tutorial. Have you ever wondered how people make colorful clouds and smoke patterns in their edits? They use colorful patterns to attract viewer’s eye using different colors in same shapes. It is a need of time that you learn making such edits so that your viewers get more beautiful images to see.
Images like this:

OK with enough words said, let’s get started with it.
Open your software i.e. Adobe Photoshop CS2 or basically any other version. Your screen will look like the picture below:

Now start a “New Project”. For that, just go to File Menu and in dropdown menu click New. A window will open on your screen asking you about the resolution, pixel rate and etc. See the following picture and fill the window according to the shown values (Follow the steps numbered as 1, 2, 3 and 4)

Now a window is opened on your screen where you can paint or write or make anything. We call it Canvas. Next thing you have to do is to “Add a Layer”. To add a layer click on small Add Layer Button on right bottom of your software screen. Following picture will show you where that button is:

Now a new layer called “Layer 1” will be added by the computer over the Background layer. At first the Layer 1 will be transparent so you would see just background white layer on canvas.
Go to Tools Tab and choose Paint Bucket Tool and choose the foreground color as Black. Now click on any place within the area of canvas. Remember! Paint black only when Layer 1 is in focus and don’t paint black on “Background layer”. Following picture explains this step so follow the numbered steps:

Next you have to make Layer 1 invisible. Click once on Layer 1. Do you see a small icon that looks like “an eye” just at the left of the layer? Click that Eye icon to make the layer invisible. You would see the background layer (which is white colored). Click on background layer to bring it in to focus. We will work on it for a while. See the following picture on how to make a layer invisible:
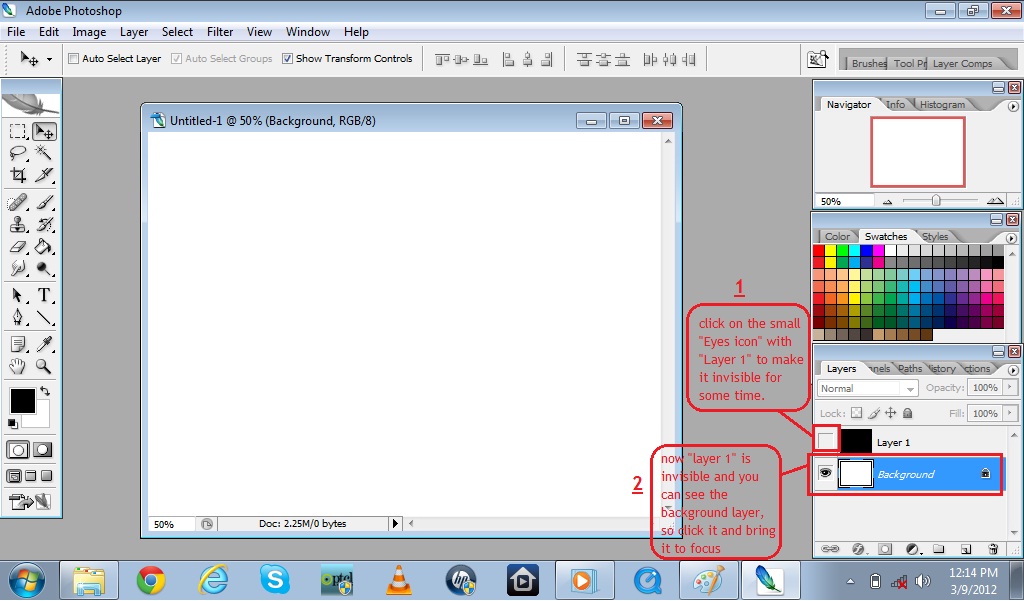
Now focus on background layer and press G on your keyboard. Gradient Tool will be selected automatically. After pressing G on your keyboard, go to the top and select the type of gradient. Select the Spectrum Gradient from the menu and double click it. Following picture explains how to do this all:

Next you have to make the gradient on your canvas. Click anywhere on you canvas. Say “point a” and drag you mouse towards “point b” and leave the click button.

A colorful spectrum would be formed on your canvas on background layer. See following picture on how to apply gradient on canvas. Now make Layer 1 visible. Click on the empty box with layer 1 to make it visible. After making it visible and your canvas will look black. Don’t worry! This is part of the edit. See the following picture, you screen would look like this:

Now click on layer 1 to bring it in focus and go to Tools Tab and select the Brush Tool. Go to the brush menu on top and select the shape on the brush and adjust the size of it. Come to the bottom of Tools Tab and click “Quick mask” button. Now click on any place on canvas just once and it will be painted red no matter what color you choose in color tab. Don’t worry coz that’s the part of edit too.
See the following picture, which will explain more easy way:

Now after this, you got to the bottom of Tools Tab and click the button mentioned in the picture below. The red area on the canvas will become “A SELECTION”. If you notice this selection will include all the area on canvas but the area inside that shape. So to fix that, go to Select Menu and in drop down menu click Inverse. This way your shape will be selected only. Not your whole canvas. See the following picture:

After this just press “Delete button” on your keyboard and your shape will be removed and bright colors would fill the place of that shape. Just like the following picture:

Now add text anywhere and you will have screen like following picture:

Now save it in .jpg format and also in .psd format. You will have a picture like following:

Same technique can be used to make this:

Similarly, you can make this


Hope this tutorial was helpful. Comment, Rate and Subscribe
Today I will let you know how to make a Colorful Sunset Scene like this:

From this:

Let’s get started. Open you software i.e. Adobe Photoshop CS2. Your starting screen would look like the picture below:

Now open the picture that you want to edit. My advice will be that you download the Original Picture of Sunset that I gave up there so that you understand each step more accurately. So download that picture of sunset by clicking it to see larger size and “save as” and open that.
Your screen would look like the following:

Now click on the first tool in “Tools Tab” and then click on “Add new layer” button on bottom right of the screen. Following picture will guide you in finding it:

Follow the Numbered Steps in above picture and you will do great.
OK now a new layer will form over “Background” layer called “Layer 1”. Click it once only to bring it to focus. (Bringing something to focus means that you tell your computer that you are going to do something related to that thing or on that thing)
Then go to Tools Tab and select Brush tool or just press Ctrl+B on your keyboard without going to tools tab. Then you would see a tiny image on one of the bar on top with a tine arrow pointing downwards with it. See the Sign 2 in the following picture if you do get the last sentence:

Now did you find the tiny image with an arrow and a number under it? Click that arrow and a menu will appear. In that menu, there will be many images. You can choose any one of them. They all are the “Styles of Brushes”. Choose an image of Circle but without shape boundary and set the Radius to 100 and Hardness to Zero.
See the following picture:

Now choose any color from Color Tab. For that, click on the upper color in color tab and a new small window will open. In that window, choose any color and click OK Button. See the following picture and follow that numbered steps:

Now bring the “Layer 1” in focus by clicking it once. And start painting on the picture as I did in following picture:

Repeat the above step with different colors i.e. change 3 to 4 colors and paint on different parts of picture and try to fill it. Don’t add a new layer for new color. Just add all colors on same layer that is Layer 1.
See following picture:

After making all the colors in Layer 1 click it and then go to Menu Bar and click Filter. Then in next menu, Click Blur and then in next menu click Gaussian Blur. Following picture will show you where to find it:

A new small window named “Gaussian Blur” will appear. Set the Radius to 99.5 pixels. And click OK button. Also double click on Background Layer and in small new window click OK Button. The Background Layer will convert into “Layer Zero”. Click on Layer 1 and change its style from Normal to Hardstyle and do the same with “Layer Zero” i.e. change its style from Normal to Hardstyle.
See following two pictures:


Now interchange the places of both layers like the following picture and you will get the desired edit:

Now save the image in .jpg format and also in .psd format. To See how to save a project take a look at https://learntoedit.wordpress.com/2012/02/25/tutorial-3-saving-the-project/
With same technique, you can make many colorful edits like:

Hope this helped
Comment, Rate and Subscribe
Hello! Today you will learn how to make this:

From this:
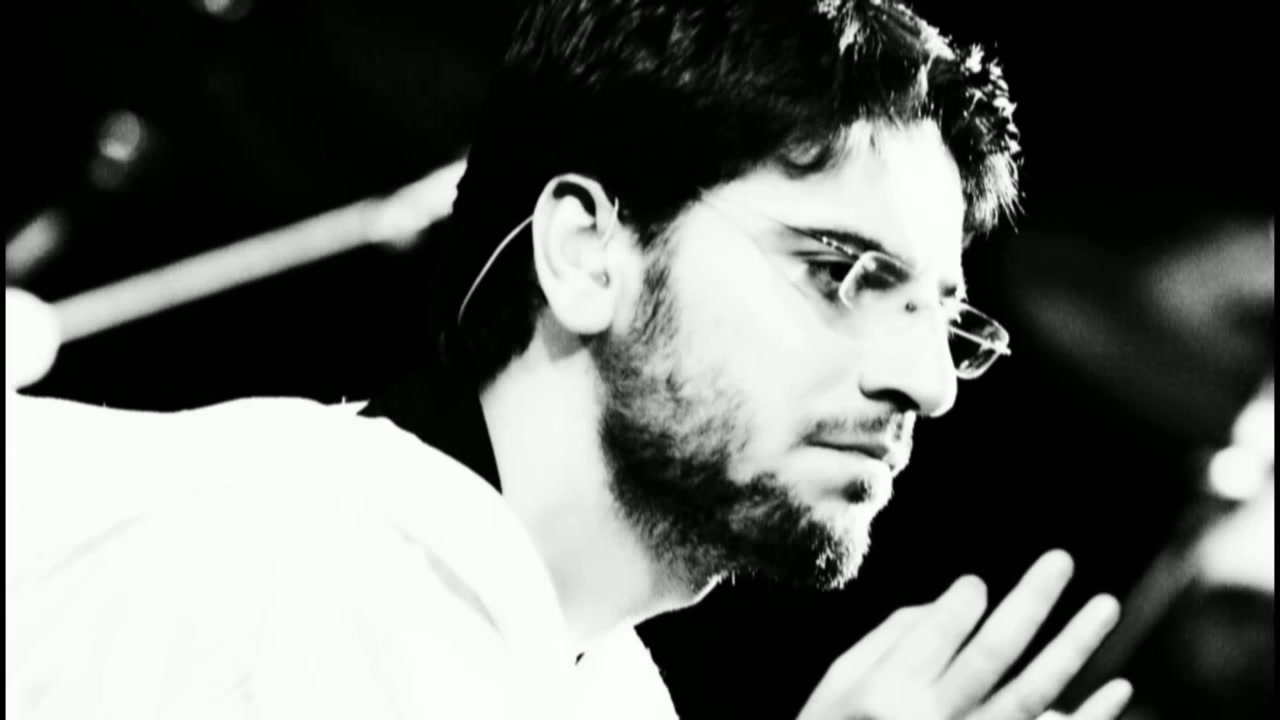
OK let’s get learning. For this type of edit you need a “black and white picture”. I am using one of the pictures of “Sami Yusuf”. He is a British singer, song writer and music composer with a beautiful voice. Ok first step will be opening the picture. If you do not know how to open any picture in Photoshop, please see the link: https://learntoedit.wordpress.com/2012/02/23/tutorial-2-opening-a-document-in-photoshop/
Your initial screen would look like this:
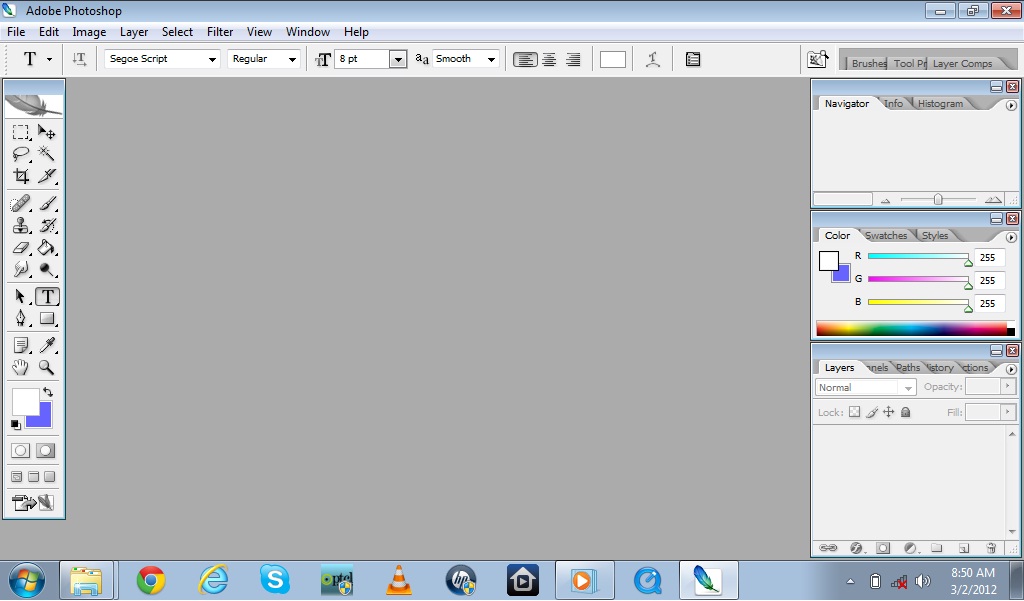
Now Open a picture from “File Menu” and click “Open” or directly press Ctrl+O. From the new window, open any Black and White or Grey scale picture. See the Red Box in following picture:

Now the picture is opened and you screen would look like following picture. I used picture of Sami Yusuf but you can use any picture you want but use black and white picture.

Do you see a small Red Box in “Tools tab”? Grab that tool by just clicking it once. Click on the picture anywhere to bring it into focus. You would see a Layer in “Layer Tab” called Background with a small icon looking like a Lock. That is the background layer, as cleared by its name. The background layer is locked so it cannot be edited but to make it a normal editable layer you just have to double click it and in new small window you just click OK button. The Background layer would convert into “Layer 0”.
Now Add Guides on the picture. For that go to “View” and in the new menu click “New Guide”. Following picture shows where you can find this option so look at the Red Box:

A new small window will appear. Click on the option named Vertical and set the Position 33%. Then press OK button. Repeat this step 1 more time with the Position 66%.

Follow the step numbers in above picture.
Now your screen (with 2 Vertical Guide Lines i.e. 1 at 33% of picture and 2 at 66%) would look like the picture below:

Now Take “Square Shape Tool” from Tool Tab and after choosing a color from the bottom of Tool Tab. Now draw a rectangle in first section of picture. Like the following picture:

If you notice, when you start making the rectangular shape on picture, a new layer called Shape 1 is created automatically.
Next add a layer yourself. You will find a New Layer button right at the bottom of Layer Tab. And make another shape with different color. Then make another layer and also a shape but with different color. Just like following picture:

You can follow the numbered steps in above picture. That will make it easy for you.
Now press Ctrl and click all shape layer i.e. Shape 1, 2 and 3 and right click them. In the menu, click Rasterize Layer. All three layers will turn into normal layer but names would be same.
Now Press Ctrl and click all shape layer i.e. Shape 1, 2 and 3 and right click them. In the menu, click Merge Layers. All three layers will merge into a single layer. This would make it easy for you to change the settings of layers.
Now click on Shape Layer and change it from Normal to Softlight. You will find this option on the top of “Layer Tab”. Just like in following picture:
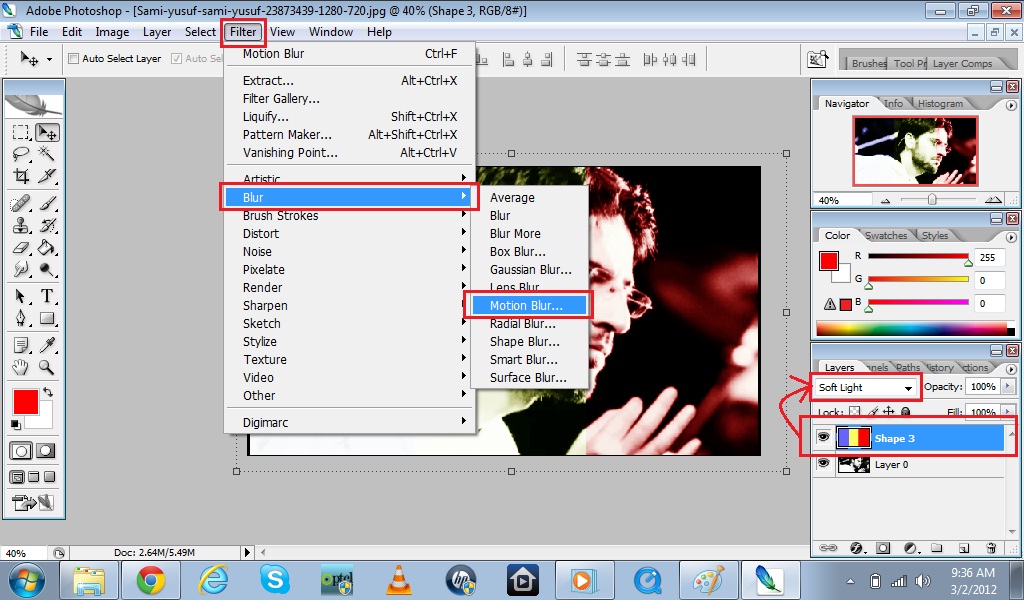
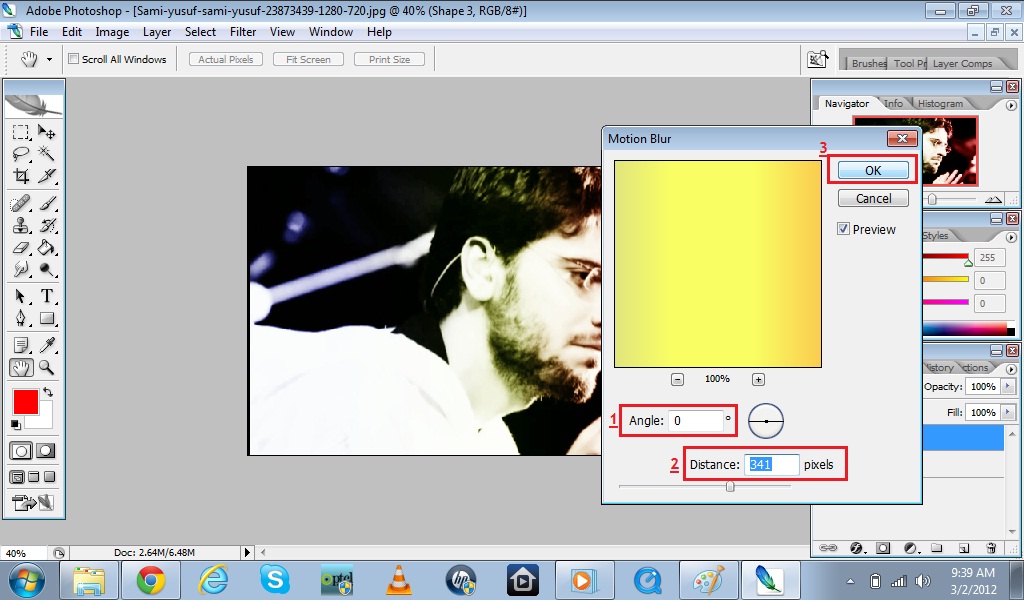
Now click it again and go to “Filter” and click “Blur” and then click “Motion Blur”. In new small window named “Motion Blur” adjust the Angle to 0, Distance to 341 and then click OK button. Just like following picture:
Now you have to change the setting of “Layer 0” from Normal to Hardstyle. See following picture for that:

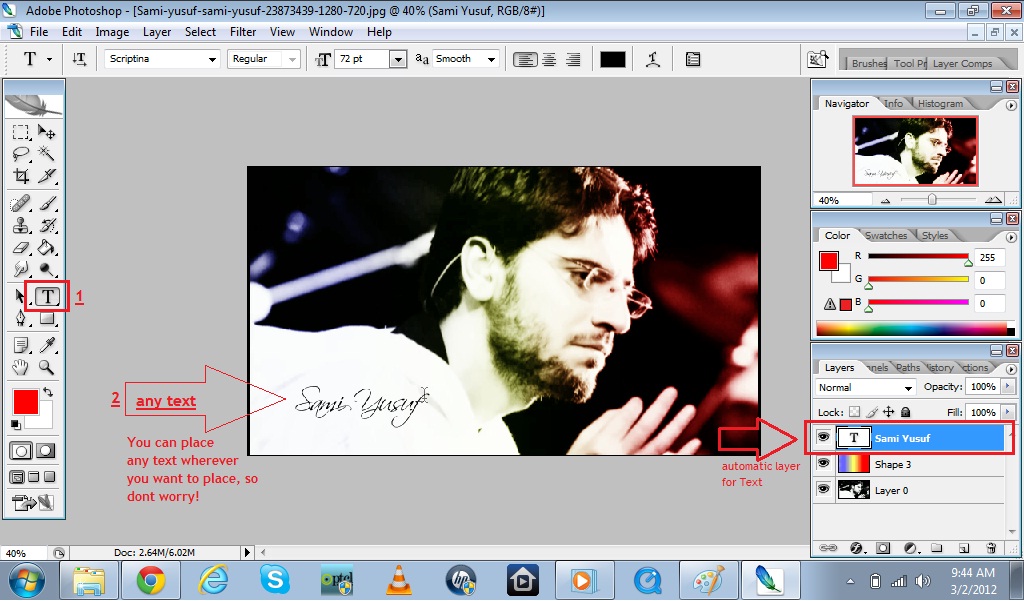
Now you have to add text in the picture. So click the icon looking like “T” and click on picture where you want to add text. A new “Text Layer” will be added in Layer Tab automatically. Now write something on the picture. See following picture:
Now Save it in .jpg format.
Final result:
That all for today! Hope this tutorial helped.
Comment, Rate and Subscribe this post for more updates. Like the Facebook Page for updates on Facebook.
Brought To You By:

Hello! Hope you guys are doing well. Okay now that we have completed 3 initial tasks which are very important, let’s move on to some real time editing. Don’t worry we will start from an easy one and I will explain you every step. We need only 1 picture from internet to be downloaded i.e. A high quality picture of “Stonehenge”. You can find it on Google Images by searching the word “Stonehenge”.
Your starting screen would look like following:

OK now open that picture into your Adobe Photoshop software. You can check the post on “Opening a picture/project”. https://learntoedit.wordpress.com/2012/02/23/tutorial-2-opening-a-document-in-photoshop/
You will have screen like following picture:

Now click on the picture once to focus on it. Then go to “Menu bar” and click on “image”. A menu will drop down. There in the new menu you will find a button named “Adjustment”. Click that and a new menu will appear. In the new menu there will be a button named “Desaturate”. Click that and your image will turn Black and White or Grey Scale. Following picture shows the process:

Now your picture (Stonehenge) will turn grey scale, it will look like this:

Next is to make some colored shape on it. For that you need some guides for right shapes. Guides are the guiding lines that allow you to make a cornered shape perfectly and do not let you make it out of shape.
Now click the picture once to get the focus and then go to “Menu Bar” and click “View” and a new menu will appear. There click a button named as “New Guide”. See following picture:

A new small window will open on your screen asking you how you want the guides to be. Click Vertical and then set the percentage by 25% (by default it is set in pixels so remove the default values and set your own). It will look like following:

Repeat this 3 times with Position 25% then 50% and then 75%. You will have a screen with three vertical blue lines like following:

Don’t worry! These lines will not be printed at the end, they are invisible just guides.
Now go to “Tools Tab” and click a tool with a square / circle shape just under a tool name “T”. Keep it pressed and a little menu will open right next to it. Chose a Square tool from the little menu and Make a rectangle on the picture. As soon as you complete that rectangle, a new layer in “Layer Tab” will be created automatically for that rectangular shape. Following picture shows how I made it:

Now do the same for another shape but use different color for that. I used yellow this time. Take a look at below picture:

In above picture you can see that I Rasterized these layers of shapes. Press Ctrl and click both layers once each. This way both shapes will be selected at the same time. Then Right click on any one of them only once. A menu will appear, click on the button named “Rasterize Layer”. Both the layers will be Rasterized. Also select both shape layers and right click on them. In new menu click “Merge layers”. This will join both layers into single layer and help in further editing.
Now double click on the layer named “Background” in the “Layer Tab” and in new window press “OK Button”. The layer with the Stonehenge picture will be named “Layer 0”. This way you can convert the Uneditable layer into an editable layer. Now click on “Layer 0” and change its layer style from Normal to Hardstyle. Following picture shows the process so follow the numbered steps in the picture:

Now do the same with other layer i.e. the layer having shapes. Change its layer style from Normal to Hardstyle. After changing the layer style of both layers i.e. “Layer 0” and “shape layer”, pick “Layer 0” and place it over the “Shape Layer”. Following picture shows this:

Next you will click on the “Shape Layer” and go to Menu Bar and click on “Filter Menu”. In next menu click on “Blur” and in next menu click on “Gaussian Blur”. Following picture will tell you how to do that:

In new small window on Gaussian Blur set the value to almost 95 and click OK button. See following picture:

You will see the Stonehenge picture as below:

Now save it in .psd format and also in .jpg format. See the post on “Saving a project” if you missed it.
By practice you can also make some good edits with this technique. Look at the following Pictures, they are also made by same technique:


Hope this tutorial was helpful. Subscribe, Follow and Comment
Brought To You By:

Ok now that you have learned to Open a project and making a New project, let’s go on and learn “How to Save a project”. When you have made something on your canvas, now it is time to save it. It’s quite simple. Suppose we have started a project. Following picture shows the starting look of the canvas:

Now go ahead and grab a tool from “Tool Tab”. A Brush would help. So press “B” or click the tool with a brush icon on it in tools tab. Following picture shows where you can get that:

Now yours may not be the same, so make whatever you want. And now to Save it, so that we will be able to open it again some other time, Go to File Menu and click it. Following picture shows where it is:

Then a new menu will appear on your screen. Your screen would look like the following:

Look at the red box in above picture. That’s the Save option. You can also press ctrl+S on your keyboard if you don’t want to go to the File Menu. A new window will appear on your screen looking like the picture below:

Here follow the number 1,2 and 3. So first, name the project. As default setting, computer will suggest that you name it “untitled” but you can name it as you want. Then secondly, click on the list which is near “2” and tell the computer what format you want it to be saved in. By default .psd (pronounced as dot PSD) format is used. It is Photoshop Document format and can only be used within Adobe Photoshop software. You can choose which format you want the file to be saved in. There is .jpg .bmp .png and many more which you can use. Format has effect on picture quality. But I would suggest that first you save the project in .psd file so that you can open it again for editing and then save it again but in .jpg format so that you have some idea what it looks like. Thus you would have 2 types of same file, it is for your ease.
Now click “Save” button (i.e. with number “3”) and your file would be saved.
Same is for “Save as”.
I hope this simple tutorial helped you getting started with Photoshop. Please ask if you have any question about formats or any other stuff related to this tutorial. Tell your opinion about it in comment.
OK now that you have learnt how to start a “New Project”. But if you have missed that post then don’t worry. Here is the link to that post:
https://learntoedit.wordpress.com/2012/02/22/tutorial-1-new-project/
Now, I assume that you have started it well so let’s go ahead and learn “How to Open a Photoshop document” or any other file that is already made. Take a look at the picture below, this would be on screen when you will open the Photoshop software:

Now to open a file, try to find “File Menu” in Menu bar. Following picture will show you where it is:

Do you see a Red Square? Yes that’s where you will click. A menu will appear on your screen just like the picture below:

Now click on OPEN in the new menu or you can press ctrl+O on your keyboard. It is a shortcut key if you do not want to go to File menu. Now after this, a new window will open with a name “Open”. Now find the file that you want to open. You can open all types of Picture files and Photoshop Documents also. Following pictures shows how to open a document:

Look at above picture. There are 2 numbers with highlights. The number represents the steps. First, you will choose the file and then click on “Open” button to open that file. Do you see a small preview of the file that you have clicked on? Yes that’s for your ease so that you would know which file you are opening.
Now you would have an opened file on your screen. Mine file is a .psd (Photoshop Document file) so it is opened. Surely your file would be something else, so don’t panic if this flag picture does not open J
You will have a screen just like the picture below:

Now let’s take a look at the Workspace that we have. Workspace is the surrounding tools and features of the software that you can use for better editing. First look at the following picture, then I will tell you the workspace and its components one by one. Right now we will have an overlook on the workspace but by time you will get used to all the tools so don’t worry.

Do you see the “Numbers”? Yes these are the components of the Default Workspace and combined they are used to make you edit easily. First one in the picture (i.e. with number “1” in a circle) is called “Tool Tab”. It contains all the required tools that you would need for editing something as you desire. Second one (with number “2” on it) is called “Navigation Tab”. It is used to help you edit small things. It is used to zoom in and zoom out and see whole file on single place. Third on (with a number “3” on it) is called “Color Tab” and it is used to assign color to something. Forth one (with a number “4” on it) is called “Layer Tab” and it is used to manage the layers. Layers are simply the transparent platforms on which you can make something and place on another layer which has another object and both would look like as they are on same platform. It helps you to move, edit, put effect on any object without disturbing other objects.
So fellows that was a simple tutorial on Opening a file in Photoshop. Hope it helped you.
Subscribe for updates and if you have any question then ask or comment what you think of this post.
OK now that you have downloaded and installed Adobe Photoshop CS2, we should be getting started. Starting with a “New Project” in Photoshop you will get first look of the software working area as following:

Now look at above picture, that’s the place you are going to invent, edit and create all of the stuff that you were wondering of. Doing so is really simple, so do not hesitate. OK moving on look at the top of the picture and there is a “Menu bar” which includes “File, Edit, Image, Layer and some more”. Do you see a Red Square on File menu? Yes that’s where you will click first. Now go on and click it. A Menu will appear looking same like in the following picture:

Take a look at the new menu, It includes option for New project. Click on “New” or press ctrl+N on your keyboard. Now a new but small page will appear asking you to tell what kind of Canvas you want to design. It will look like following picture:

Now use “Preset” to tell the ratio of canvas you want. If you want to make a picture that fits an A4 size page then click on Preset and select A4. Similarly, use other presets to set variety of ratios. In this project I have used a ratio of 1024 pixels in Width and 600 pixels in Height. It means the canvas that I will have will be 1024 pixel wide and 600 pixel high. After setting the ratio, click OK button, and the canvas will now open with a White background. It will look like following picture:

Now you are good to go.
In next tutorial we will focus on “How to Open a Project that is already made“. Hope this simple tutorial got you started quite well.
Please Leave Comment If You Have Any Question.

Adobe Photoshop
Welcome to “Learn Photoshop Editing”.
Have you ever wondered how the movie posters or wallpapers are made? How people add effects in photos to make them look better? Do you want to know the trick they use for all those designing and editing stuff? If Yes then you are at the right place now.
Here, I will be providing a reasonable information about how to edit some ready-made photos or design new ones. Software we will be using is Adobe Photoshop. Most features in all the series are quite same, so don’t worry if you have some other version of Photoshop. I mostly use Photoshop CS2 because it is simple yet creative.
To make it really easy for you, I will post the tutorials step by step i.e. starting from Beginner’s level and after completing “Basic Tasks” we will move on to a Creativity Section and there we will try to make some high quality designing and editing.
First, you need to download the software.Here is the download link for Adobe Photoshop software: http://download.cnet.com/Adobe-Photoshop/3000-2192_4-10401295.html

